Friday, October 31, 2008

National Museum of Funeral History

Here are two more images from the "Celebrating the Lives and Deaths of the Popes" exhibit at the National Museum of Funeral History in Houston, Texas.


Camera / lens: Canon 40D / Canon 17-55mm f/2.8 zoom
Post-processing: Photoshop CS3 > High Pass Sharpening > Merge Visible to New Layer > Topaz Adjust Plugin @ 45% > Curves Adjustment Layer to adjust contrast > Levels Adjustment Layer to set black point > Merge Visible to New Layer > Distort Lens Correction Vignette


Camera / lens: Canon 40D / Canon 17-55mm f/2.8 zoom
Post-processing: Photoshop CS3 > High Pass Sharpening > Merge Visible to New Layer > RPM Beautifier Plugin @ 32% > Levels Adjustment Layer to improve shadow detail

Thursday, October 30, 2008

National Museum of Funeral History

This past Saturday I visited the National Museum of Funeral History which happens to be in Houston. The museum has exhibits of many different antique hearses, both motorized and horse drawn, unusual caskets, a recreated turn of the century casket factory and many other funeral history related exhibits. Genevieve Keeney, the director of the museum gave me an advance tour of the upcoming exhibit of "Celebrating the Lives and Deaths of the Popes." I think you can tell from the photos I'll be posting over the next couple of days that the the exhibit is first class. Make sure you visit their website (www.nmfh.org) for more information if you are in the Houston area (around Bush International Airport) and are looking for a unique museum experience.

Title: "Outside St. Peters Square"


Camera / lens: Canon 17-55mm f/2.8 zoom
Post-processing: Photoshop CS3 > High Pass Sharpening > Merge Visible to New Layer > Topaz Adjust Plugin Spicify at 78% > Merge Visible to New Layer > Cloning to remove a front rope barracade > Merge Visible to New Layer > Distort Lens Correction Vignette

Wednesday, October 29, 2008

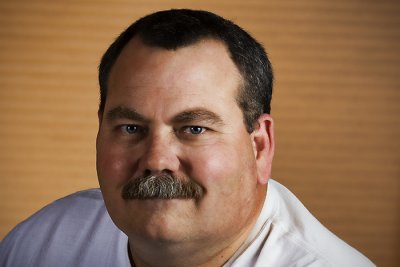
Another Environmental Portrait

I had a Doctor's appointment today. Dr. Christensen has been my orthopedic surgeon for over 35 years. He's a good man and a good doctor. The strange thing is he never seems to age. He looks the same to me now as when I first met him!

Anyway I had my camera with me (because I never leave it unattended in my car) and I decided to try another environmental portrait. I opened the blinds to try and add some interest to the ambient lighting and popped of three quick pics (I had given some pre-thought to the pose before he came in the room). This was my favorite of the shots I took.

Title: "Dr. C"


Camera / Lens: Canon 40D / Canon 17-55mm f/2.8 zoom lens
Post-processing: Photoshop CS3 > High Pass Sharpening > Merge Visible to New Layer > Topaz Adjust Plugin "Spicify" + Manual Noise Reduction > Merge Visible to New Layer > Nik Viveza Plugin to lighten up his face > Merge Visible to New Layer > Brightness / Contrast Adjustment layer to brighten the entire image > Merge Visible to New Layer > Copy selection (all but the top 10% or 15% of the original) to a new layer and used free transform to skew the image to the top > Merge Visible to a New Layer > Distort Lens Correction Vignette

Tuesday, October 28, 2008

Environmental Portrait

I wanted to try out my new Pocket Wizards (radio controlled remote flash triggers) so I asked a co-worker to pose for me. I'm was going for a little humor here obviously but I was also hoping to get a usable image for the Bay Area Photo Club's upcoming assignment of Environmental Portrait. I used my Canon 430EX flash with an attached LumiQuest soft box mounted on a monopod. I had another co-worker hold the monopod above camera right.

I would appreciate any opinions on the photo and how you think it might be judged as an environmental portrait.

Title: "Overworked"


Camera / Lens: Canon 40D / Canon 17-55mm f/2.8 zoom
Post-processing: Photoshop CS3 > Topaz Adjust Vibrance > Merge Visible to New Layer > Filter Stylize Diffuse Anisotropic > Merge Visible to New Layer > Copy a portion of the stack of files and desk to new layer > Move the current layer up to remove negative space at the top of the photo > Move to the new layer and scale the previous portion of the photo to fill the space left vacant when I moved the layer beneath upward

Monday, October 27, 2008

Hold Your Nose and Vote McCain

No photo today; I just felt compelled to post some political commentary for what its worth.

HEADLINES FROM THE DRUDGE REPORT (WWW.DRUDGEREPORT.COM) ON October 27, 2008:

2001 OBAMA: TRAGEDY THAT 'REDISTRIBUTION OF WEALTH' NOT PURSUED BY SUPREME COURT

THE OBAMA VAULTS: Constitution 'reflected fundamental flaw of this country that continues to this day'...

'I'm not interested in the suburbs. The suburbs bore me'...


If you want to read the entire stories behind the links go to www.drudgereport.com and follow the links from there.

Sunday, October 26, 2008

I Built A Fence Today

My neighbor and I rebuilt the fence between us today. This was an old fence that had seen better days and was finally finished off by Hurricane Ike! Men will enjoy these pics! Men can you smell the sawdust? Ladies, sorry nothing for you today!

Title: "Try Square"


Title: "A Little Perspective"


Title: "Close Enough"


Title: "Good Old Saw"


Title: "Get R Done"


Camera / Lens: Canon 40D / Canon 17-55mm f/2.8 zoom
Post-processing: Photoshop CS3 > High Pass Sharpening > Merge Visible to New Layer > Curves Adjustment Layer for added contrast > Merge Visible to New Layer > Distort Lens Distortion Vignette > Merve Visible to New Layer > Virtual Photographer "Copper" filter

Saturday, October 25, 2008

Texas Renaissance Festival

Here are the last couple of photos I'm going to post from my trip to the Texas Renaissance Festival in Magnolia, Texas last Saturday. At the Tomato Torrent attraction you toss ripe tomatoes at this guy while he tosses crude insults at you!

Title: "Tomato Torrent"


Camera / Lens: Canon 40D / Canon 100-400mm L zoom
Post-processing: Photoshop CS3 > High Pass Sharpening > Merge Visable to New Layer > Topaz Adjust > Curves Adjustment Layer for added contrast > Levels Adjustment layer to set the black point

I'm not really sure how this guy fits into the Renaissance theme but he was the most unusual character I saw all day!

Title: "Green Mask Dude"


Camera / Lens: Canon 40D / Canon 100-400mm L zoom
Post-processing: Photoshop CS3 > High Pass Sharpening > Merge Visable to New Layer > Topaz Adjust Photo Pop

Friday, October 24, 2008

Ren Fest Ladies

Title: "Fair Maiden"

Click the image for a larger view!
Camera / Lens: Canon 40D / Canon 100-400mm L zoom
Post-processing: Photoshop CS3 > High Pass Sharpening > Merge Visable to New Layer > Topaz Adjust Photo Pop @ 37% Opacity > Merge Visable to New Layer to do some minor cloning work

Title: "Lady"

Click the image for a larger view!
Camera / Lens: Canon 40D / Canon 100-400mm L zoom
Post-processing: Photoshop CS3 > High Pass Sharpening > Merge Visable to New Layer > Topaz Adjust Photo Pop > Merge Visable to New Layer > Nik Viveza plug-in to brighten the shadow area under the lady's hat just a little

Thursday, October 23, 2008

Ren Fest Characters

Here's two more pics form my trip to the Texas Renaissance Festival in Magnolia this past Saturday!

Title: "Skull Beard"

Click the image for a larger version!

Camera / Lens: Canon 40D / Canon 100-400mm L zoom
Post-processing: Photoshop CS3 > High Pass Sharpen > Merge Visible to New Layer > Topaz Adjust Simplify > Merge Visible to New Layer > Clone out patch on shirt > Merge Visible to New Layer > Virtual Photographer "Anvil" at 26% opacity > Merge Visible to New Layer > Paint with Black Paint Brush over upper right hand corner to eliminate a high contrast white background

Title: "Ahoy"

Click the image for a larger version!

Camera / Lens: Canon 40D / Canon 100-400mm L zoom
Post-processing: Photoshop CS3 > High Pass Sharpening > Merge Visible to New Layer > Topaz Adjust Simplify > Curves Adjustment Layer for added contrast > Hue / Saturation Layer to increase Saturation (careful - only a little) > Merge Visible to New Layer > Distort Lens Correction Vignette

Wednesday, October 22, 2008

Ren Fest Characters

Here are a couple more photos I took at the Texas Renaissance Festival in Magnolia, Texas last Saturday. I like the quality of light in both photos.

Title: "Big Hat Guy"

Click the image for a larger version!

Camera / Lens: Canon 40D / Canon 100-400mm L zoom
Post-processing: Photoshop CS3 > High Pass Sharpening > Merge Visible to new Layer > Topaz Adj Plugin "Spicify" > Curves Adjustment Layer to increase contrast > Merge Visible to New Layer > Distort Lens Correction > Vignette

Title: "Knight"

Click the image for a larger version!

Camera / Lens: Canon 40D / Canon 100-400mm L zoom
Post-processing: Photoshop CS3 > High Pass Sharpening > Merge Visible to new Layer > Red Paw Media Bleach Bypass plugin

Tuesday, October 21, 2008

Elves

I took this photo at the Texas Renaissance Festival last Saturday. These elves were fascinated with my camera, or as they called it my "clicky box!" I don't think I saw anyone enjoying their role as participants at Ren Fest more than these guys were!

Title: "The Elves"

Click the image for a larger view!

Camera / Lens: Canon 40D / Canon 100-400mm L zoom

Monday, October 20, 2008

Mud Men

From my visit to the Texas Renaissance Festival in Magnolia this past weekend. The Sturdy Beggars have been performing the Mud Show since the very inception of the Texas Renaissance Festival in 1980. Their act is hilarious and you don't want to miss it if you have an opportunity to see it.

Title: "Mud Man 1"

Click the image for a larger view!

Title: "Mud Man 2 - Sans Mud"

Click the image for a larger view!

Sunday, October 19, 2008

Austin, Renn Fest

The last of my photos from my trip to Austin, Texas last weekend is both a photo and a question! How would you answer the question?

Title: "A Question for God"

Click the image for a larger version!

This weekend (Saturday) I went to the Texas Renaissance Festival in Magnolia, Texas. Ren Fest has been going on since around 1980 and is always a lot of fun to attend! The venue is on many acres and features multiple stages where different performers (jugglers, magicians, bands, novelty acts, etc) entertain the crowds at various times throughout the day. There are also shops, games, food concessions, and rides. Ren Fest is a place where you can go and have a really good time every weekend in October and a few weekends in November. The photo I'm posting today from Ren Fest is an owl featured in the 'Birds Of Prey" show on Falconer's Stage.

Title: "Bird of Prey"

Click the image for a larger version!

Saturday, October 18, 2008

Six Pack Lead Guitarist

This is the lead guitarist from the blue grass bank Six Pack. We saw them perform at the Thirsty Nickel in Austin, Texas last weekend. They were a terrific high-energy band!

Title: "Six Pack Lead Guitarist"


Camera / Lens: Canon 40D / Canon 50mm f/1.4 prime
Post-processing: Photoshop CS3 > Mainly a Dragonizer action I downloaded from the Internet. The Dragonizer action steps you through the process of making the photo darker and giving it a gritty effect.

Friday, October 17, 2008

Barton Springs Canoes

While in Austin last weekend, Jan Klier and I went down to Barton Springs to do some shooting on Sunday morning. We walked down to a really cool spot where a canoe rental business operated on the side of the creek (Barton Creek? Barton Springs Creek?). The creek here was beautiful with clear water, ducks, swans, and overhanging trees. I took this one photo and my camera card was full (I hate it when that happens; someday I'll learn to carry a spare)!

Title: "Barton Springs Canoes"

Click the image for a larger view!

Camera / Lens: Canon 40D / Canon 50mm f/1.4 prime
Post-processing: Photoshop CS3 > Duplicate Background > Topaz Adjust plugin "Simplify" plus an adjustment to the Detail slider to reduce detail even further > Merge Visible to New Layer > Distort Lens Correction Vignette > Brightness / Contrast Adjustment Layer to brighten up the image a tad bit

Thursday, October 16, 2008

Mark

Brian and I stopped and talked to Mark on 6th Street in Austin last weekend. Mark spends his time talking about Jesus to anyone and everyone who will listen to his message. Mark isn't pushy about what he does but he is definitely enthusiastic! You can see in his eyes there is no doubt about his faith or his beliefs. I hadn't felt bad before I talked to Mark but I still felt somehow better once I did.

Title: "Mark"

Click the image above to view a larger version of it!

Camera / Lens: Canon 40D / Canon 50mm f/1.4 prime
Post-processing: Photoshop CS3 > High Pass Sharpening > Merge Visible to New Layer > Topaz Adjust plugin "Dramatic" at 55% Opacity > Merge Visible to New Layer > One Pixel Border Action (4 times with different colors)

Wednesday, October 15, 2008

Tattoo Session

There are a lot of tattoo parlors on 6th Street in Austin, Texas (I lost count)! This one has a large window to facilitate the curious (and the photographers)! This shot was taken on my trip to Austin last weekend.

Title: "Dude! That Will Still Be There When You Sober Up!"

Click on the image above to view a larger version of it!

Camera / Lens: Canon 40D / Canon 50mm f/1.4 prime
Post-processing: Photoshop CS3 > High Pass Sharpening > Merge Visible to New Layer > Topaz Adjust Plugin "Simplify" > Merge Visible to New Layer @ 70% > Merge Visible to New Layer > Red Paw Media Bleach Bypass plugin with a mask to preserve contrast in some areas of the two main subjects > Merge Visible to New Layer > Minor cloning to eliminate some distracting background elements

Tuesday, October 14, 2008

Guero's Guitar Man

Our table was treated to a song from Guero's roaming singer (compliments of Steve Barth)last Friday night in Austin, Texas!

Title: "Guero's Guitar Man"

Click the image above to view a larger version!

Camera / Lens: Canon 40D / Canon 17-55mm f/2.8 zoom
Post-processing: Photoshop CS3 > High Pass Sharpening > Merge Visible to new layer > Topaz Adjust "Spicify" + "Simplify" @ 74% Opacity > Merge Visible to new layer > Topaz Adjust "Portrait Drama"

Monday, October 13, 2008

Custom Ride

We spotted this custom bike on 6th Street in Austin, Texas on Saturday night.

Title: "Cool Ride"


Camera / Lens: Canon 40D / Canon 50mm f/1.4 prime lens
Post-processing: Photoshop CS3 > High Pass Sharpening > Merge Visible to New Layer > Topaz Adjust plugin "Noise Reduction" with a layer mask used to preserve the forground and subject detail by painting with black to fully or partially block the noise reduction > Merge Visible to New Layer > Distort Lens Correction Vignette

Sunday, October 12, 2008

Car at Guero's

I just got back from a long weekend in Austin, Texas. I met up with a few friends that I originally met at a Radiant Vista workshop earlier this year in Savannah, Georgia. A good time was had by all and I personally picked up a lot of valuable photography tips from this group of experienced photographers.

The photo I'm posting today was taken outside of Guero's Restaurant on Friday night.

Title: "Austin Classic Car"

Click the image for a larger version!

Camera / Lens: Canon 40D / Canon 17-55mm f/2.8 zoom
Post-processing: Photoshop CS3 > High Pass Sharpening > Merge Visible to new layer > Topaz Adjust plugin "Spicify" + "Simplify" at 41% Opacity > Curves Adjustment to increase contrast > Levels Adjustment Layer to set the black point > Merge Visible to new layer for minor cloning > Merge Visible to new layer in Screen Blending Mode for overall lightening

Saturday, October 11, 2008

The Flagship

Today's shots are of the Flagship Hotel in Galveston, Texas taken last weekend. The damage is courtesy of Hurricane Ike!

Title: "Room for Rent"

Click the image for a larger version!

Post-processing: Photoshop CS3 > Copy Background Layer > Topaz Adjust Plugin "Vibrance" > Merge Visable > Distort Lens Correction Vignette

Title: "Room Detail"

Click the image for a larger view!

Post-processing: Photoshop CS3 > Copy Background Layer > Topaz Adjust Plugin "Vibrance" > Merge Visable > Distort Lens Correction Vignette

Friday, October 10, 2008

Galveston After Ike

Today's photos were all taken on the drive down Broadway in Galveston last weekend. Broadway is Galveston's main boulevard. It runs between I-45 from Houston and the beach and is the address for many of Galveston's grand historic homes. In each photo you can see something different of the damage remaining and under repair three weeks after the arrival of hurricane Ike. The common element in each photo is the dead (or dying) greenery (I assume from being covered by salt water from the Gulf of Mexico):

Title: "Drive By 1"

Click the image for a larger version!

Title: "Drive By 2"

Click the image for a larger version!

Title: "Drive By 3"

Click the image for a larger version!

Camera / Lens: Canon 40D / Canon 17-55mm f/2.8 zoom lens
Post-processing: Photoshop CS3 > Duplicate Background Layer > Topaz Adjust plugin "Spicify" @ 70% opacity > Merge to New Layer > Distort Lens Correction Vignette

Thursday, October 9, 2008

The Strand

Today's images are of The Strand in Galveston, Texas from our visit there last Saturday. The Strand is Galveston's historical business district and home to souvenir shops, restaurants, clothing stores and art galleries. Prior to hurricane Ike The Strand would be crowded with tourists on any given Saturday but on this Saturday, three weeks after hurricane Ike, the historical district is abandoned except for construction workers!

Title: "The Strand: Post Ike"

Click the image for a larger version!

Post-processing: Photomatix (HDR conversion from three handheld exposures (-2,0,+2) > Photoshop CS3 > High Pass Sharpening > Merge to new layer > Noise Reduction > Merge to new layer > Distort Lens Correction > Vignette > Curves Adjustment with masking > Levels Adjustment with masking

Title: "Strand Closed"

Click the image for a larger version!

Post-processing: Photomatix (HDR conversion from three handheld exposures (+2,0,-2) > Photoshop CS3 > High Pass Sharpening > Merge to new layer > Noise Reduction > Merge to new layer > Topaz Adjust Plugin "Photo Pop" > Merge to new layer > Distort Lens Correction Vignette > Levels adjustment layer with mask

Wednesday, October 8, 2008

Hurricane Ike Damage, Seawall Blvd in Galveston

Familiar parts of Galveston's history, culture and mystique were lost to Hurricane Ike in September 2008. I took this series of photos last weekend of the remains of the Mermaid Pier and Murdoch's souvenir shops. There was nothing at all left to photograph of the famous Balinese Room (not even the pilings). If you want to see what these buildings looked like before Ike you can see them preserved by Google Street View (start by looking at 2262 Seawall Blvd, Galveston, TX and then "walk" down to the Balinese.

Title: "Galveston History Lost"

Click the image for a larger view!

Title: "Pilings Past"

Click the image for a larger view!

Title: "Pilings Past 2"

Click the image for a larger view!

Title: "Pilings Past 3"

Click the image for a larger view!

Technical Photography Info:
Camera / Lens: Canon 40D / Canon 17-55mm zoom lens
Post-processing: Photomatix (HDR conversion of three hand held exposures taken at (-2, 0, +2) > Photoshop CS3 > Red Paw Media Beautifier layer @ 30% opacity, > Levels adjustment to set black and white points

Tuesday, October 7, 2008

Galveston, Hurricane Ike Damage

My brother and I went down to Galveston this weekend to have a look around. This was our first time back since Hurricane Ike and needless to say Ike's effects were visible everywhere! Sometimes the effects were quite obvious and sometimes we only knew things looked different and we didn't know exactly why. I guess it works that way when something that used to be in a place is now gone. You don't know exactly what is missing (a tree or an old building?) because you don't know the place all that well...but you know it well enough to know something (a billboard or street sign?) is missing.

I thought the following photo was powerful on several different levels!

Title: "Missing History"

Click the image for a larger version!

Historical Markers all over Texas are sturdy cast iron affairs. I suspect that it took more than a little force to damage this marker in this way.

The next photo gives an indication of the tremendous amount of debris piled on the Seawall, especially considering this was three weeks after the hurricane and tons and tons of debris has already been removed.

Title: "Sullied Seawall"

Click the image for a larger version!

The next photo is of the 61st Jetty and Fishing Pier. Only the jetty remains! The fishing pier, which extended from the jetty by approximately the length of the remaining jetty, and the two level bait and tackle shop on the end are gone!

Title: "Just the Jetty Now"

Click the image for a larger version!

Theses shots were all taken with my Canon 40D and Canon 17-55mm f/2.8 zoom lens.

Monday, October 6, 2008

Bonus Post (Roller Coaster)

Here's a bonus post in honor of today's stock market!


Click the image for a larger version!

Post-processing: Photoshop CS3 > High Pass Sharpening > Topaz Adjust "Photo Pop" > Distort Lens Distortion Vignette

Wine Bar

Sometimes I like a photo in spite of the fact that it has some obvious technical problems. This photo taken at the Driftwood Vineyard and Winery is an example. It was a grab shot I took blind, holding the camera at my side and snapping as I walked. The focus was on infinity somewhere among the trees outside and the horizon of the original capture was at about a 45 degree angle. I still liked the moment and colors and composition enough to spend some time rotating and cloning and "improving" the shot at my computer. The end result: I like it in spite of its flaws and I hope you do as well!

Title: "Wine Bar"

Click the image for a larger view!

Camera / Lens: Canon 40D / Canon 17-55mm f/2.8 zoom

Post-processing: Photoshop CS3 > Duplicate Layer > Free Transform to rotate the image closer to horizontal > High Pass Filter for sharpening > Merge Visable to New Layer > Topaz Adjust Plugin "Simplify" > Merge Visable to New Layer for Cloning to fill in corner areas left blank by rotating with Free Transform > Distort Lens Correction Vignette > Curves Adjustment for added contrast

Sunday, October 5, 2008

Hibachi Chef

I took my camera with us to the local Japanese Hibachi restaurant for lunch yesterday. This is our chef doing the famous "onion volcano" trick! :-)


Click the image for a larger version (highly recommended)!

Camera / Lens: Canon 40D / Canon 17-55mm f/2.8 lens
Post-processing: Photoshop CS3 > High Pass Sharpening > RPM Bleech Bypass Plugin with Mask to block the effect (painting on the mask with Black) on the main subject > Hue / Saturation Layer to increas Saturation by 19% > Selective Color Adjustment with Mask to bump up the background warm and cool colors to add punch

Saturday, October 4, 2008

Quiet Repose, Cropping

I photographed this couple as they enjoyed a quiet moment at the Driftwood Vineyard and Winery in Driftwood, Texas.


Click the image above (reommended) for a larger version!

Technical Photography Stuff: Cropping: Members of the photo club I belong to (Bay Area Photo Club) submit large prints (typically at least 11X14) on our monthly critique night. It makes sense because a large print makes it easier for the judges and other members to view the print. One negative associated with always needing a large print to present is that it trained me early on to not do much cropping for fear of losing too much detail to print a good quality large photo. It has been an unexpected pleasure of blogging that I now have the option of using photos for posting on my blog that are significantly smaller than the original capture. The image I posted today for example is approximately a 25% crop of the orignal and I like it a lot because of the moment it represents! If I wasn't a blogger now I wouldn't have had a use for this pic because I wouldn't be able to use the small crop for a large print. Being able to crop and use portions of photos has in turn given me even greater insight into what makes a good composition in the first place and that in turn will allow me to compose more shots that don't require cropping! It part of the circle of life I guess! :-)

Camera / Lens: Canon 40D / Canon 17-55 f/2.8 zoom
Post-processing: Photoshop CS3 > Topaz Adjust Plugin - "Vibrance" > Cloning to eliminate an empty chair and other distractions > Merge Visible to New Layer > Filter Distort Lens Distortion Vignetting

Friday, October 3, 2008

An Old Jeep

I found this old abandoned Jeep on the side of the road leading to the Driftwood Winery in Driftwood, Texas last weekend. It is a scientifically proven fact that a photographer can not see one of these rusty relics and not stop to photograph it! :-)

Title: "Hard to Believe its a Jeep!"

Click the image for a larger version!

Camera / Lens: Canon 40D / Canon 17-55mm f/2.8 zoom
Post-processing: Photomatix HDR (handheld exposures @ -2,0,+2) > Photoshop CS3 > Topaz Adjust "Mid_Details" + "Vibrance" > Curves Adjustment layer for final contrast pop

Thursday, October 2, 2008

Cypress Tree on Cypress Creek

Taken near the Wimberley town square from the bridge over Cypress Creek last weekend.

Title: "Cypress Creek"

Click the image for a larger version!

Taken with my Conon 40D and Canon 17-55 f/2.8 zoom lens. Post-processing: Photoshop CS3 > Exposure and Contrast adjusted using Topaz Adjust Plugin > Merge Visible to New Layer and darken using Levels Adjustment Layer > added a mask clipped to the Levels Adjustment Layer and used the Gradient tool on the mask to gradually block the Levels Adjustment toward the center of the image (making the photo brighter in the center where the main tree is).

Update on Bailout Rant from Yesterday: The Senate passed their version of the Bailout yesterday. Only 25 of the idiots got it right by voting No. The 2 idiot Senators from Texas both voted Yes and have insured that I will vote for their opponents in their next elections. This in spite of growing public opinion against the Bailout which is of course why our idiot politicians and our idiot President are pushing so hard to pass this bill quickly. It will never pass if the American people are given adequate time to gain an understanding of the problem and to get a good hard look at the bill itself! God save us from our elected officials!